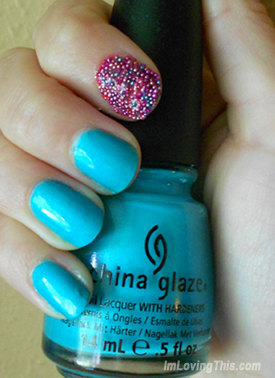
 Caviar Nails are one of the latest nail trends happening right now. I wanted to try it out but didn’t want to spend the money to buy a kit. Sephora has a Caviar Manicure set for sale for $25 which I wasn’t willing to spend.
I decided to do a search on eBay for the caviar beads to create the look. I found a ton of them for around $2 and that included shipping. I ordered two batches from two different places. I got a ton of different coloured beads for under $5 to my door. You can find the caviar beads on eBay if you search for “caviar nail beads” or “nail beads”. I find the best deals from the Hong Kong area.
Once you have your beads all you need is some nail polish which I already had plenty of that on hand. The caviar nail look requires a base coat, a colour of your choice and a top coat.
Personally I decided to just do one nail with the caviar look and the paint the rest with China Glaze Turned Up Turquoise.
You will also need to do is find a Tupperware or something to put the beads in. I decided to make a multicoloured nail so I mixed some pink, purple and turquoise beads together into the bowl.
Next you will want to prep your nails with a base coat.
If you want to just do one caviar nail then you will just paint the colour of your choice onto the one nail and then dip the nail into the caviar beads. Just roll it back and forth gently to pick up the beads. You could also carefully place the beads on into a pattern of your desire. Next just pres down on the beads to make sure they are in place. I recommend waiting about 10 to 15 minutes for it fully dry.
You can then paint the rest of your nails with the colour of your choice. If you are doing all your nails caviar style then you will want to do the bead process one by one for the best results.
As you can see it is way cheaper to order your beads online from eBay and create your own caviar kit than to buy one of those caviar nail kits from Sephora. My caviar nails lasted two days. To remove it I just used a cotton ball and nail polish remover. They came off very easily.
Tips:
- If you want to make your manicure last longer than use resin to apply the beads. That way they will hold longer.
- You can try adding a clear top coat. Sometimes this will cause certain beads to run, so I’d test it first.
I hope you enjoy this DIY caviar nail manicure and try it out for yourself!


Such a fun look, I don’t think I’ve seen the caviar nails yet!
I love it and it’s pretty easy to do. Doesn’t require any special talents like other manicures I’ve seen people do.